Overview
A default Cisco switch is not secure. Out of the box it has no passwords, no encryption, no access restrictions, and no SSH. Before any switch is deployed in a production environment it must be hardened with a security baseline.
In this lab I applied a complete security baseline to a Cisco Catalyst WS-C3560G running IOS 12.2(55)SE12. The process covered device identity, password security, console hardening, local administrator creation, SSH configuration, and final verification.
This lab demonstrates how to take a Cisco switch from a default state to a production-ready security configuration.
Objectives
By completing this lab I was able to:
- Configure device identity including hostname, MOTD banner, and DNS settings
- Secure privileged access using enable secret
- Enable service password encryption
- Harden the console line with a password, timeout, and logging
- Create a local administrator account
- Generate RSA keys and enable SSH version 2
- Restrict VTY lines to SSH only with local authentication
- Save and verify the full security configuration
- Test SSH access from a Windows client
Lab Environment
Hardware
- Cisco Catalyst WS-C3560G-24PS-E
- Windows 11 Laptop
- Console Cable
- Ethernet Cable
Software
- Cisco IOS 12.2(55)SE12
- PuTTY — console access
- Windows SSH Client — SSH testing
Network Topology
The switch was connected directly to the Windows 11 laptop via console cable for initial configuration. An Ethernet cable was used to test SSH connectivity once the management IP was configured.
Windows 11 Laptop
192.168.1.100
      │
      │ Ethernet + Console
      │
Cisco Catalyst 3560G
VLAN 1: 192.168.1.10
Initial State
Before hardening, the switch was in a default configuration:
- No hostname set
- No passwords configured
- No SSH enabled
- No local users
- Telnet enabled on VTY lines
- No banner configured
Step 1 — Device Identity
The first step was to configure the device identity. This included setting a meaningful hostname, configuring a login banner to warn unauthorised users, and disabling DNS lookup to prevent the switch from attempting to resolve mistyped commands as hostnames.
hostname SW1

no ip domain-lookup

banner motd ^
******************************************
*  AUTHORISED ACCESS ONLY               *
*  Unauthorised access is prohibited    *
*  All activity is monitored and logged *
******************************************
^

Step 2 — Password Security
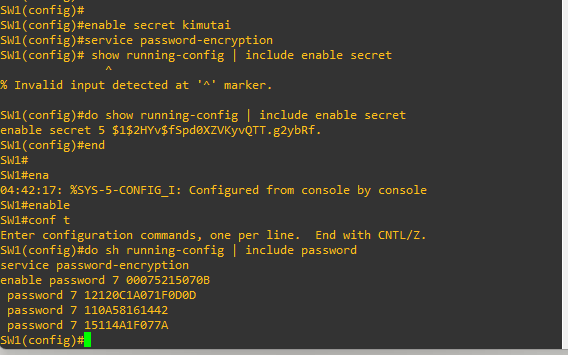
The enable secret command sets an encrypted password required to enter privileged EXEC mode. Unlike the older enable password command, enable secret uses MD5 hashing and cannot be reversed.
Service password-encryption encrypts all plaintext passwords stored in the running configuration.
enable secret YourSecurePassword

service password-encryption
Verification
show running-config | include enable secret
show running-config | include password
Step 3 — Console Line Hardening
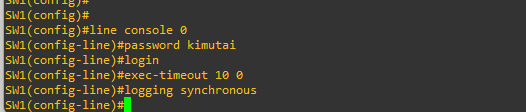
The console line is the physical management port on the switch. Without a password, anyone with physical access and a console cable can access the device with no authentication.
The exec-timeout command automatically logs out an idle console session after the specified time. Logging synchronous prevents syslog messages from interrupting commands being typed.
line console 0
 password YourConsolePassword
 login
 exec-timeout 10 0
 logging synchronous
Step 4 — Local Administrator Account
A local administrator account provides named, auditable access to the device. Using privilege level 15 grants full administrative access. This account will be used for SSH authentication.
username admin privilege 15 secret YourAdminPassword
Verification
show running-config | include username

Step 5 — Configure SSH
SSH (Secure Shell) provides encrypted remote management access. Telnet sends all data including passwords in plaintext and must never be used in a production environment.
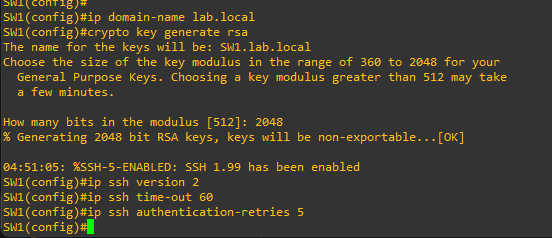
To enable SSH, a domain name must be configured first as it is used to generate the RSA key pair. RSA 2048-bit keys provide strong encryption. SSH version 2 is more secure than version 1 and should always be specified.
ip domain-name lab.local

crypto key generate rsa modulus 2048

ip ssh version 2

ip ssh time-out 60

ip ssh authentication-retries 3
Step 6 — Secure VTY Lines
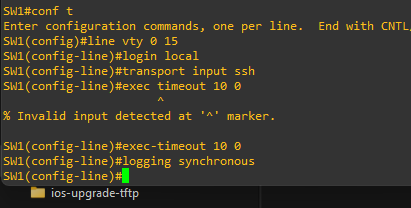
The VTY lines handle remote management connections. By default they allow Telnet. Restricting them to SSH only and requiring local authentication ensures only authorised users with valid credentials can connect remotely.
line vty 0 15
 login local
 transport input ssh
 exec-timeout 10 0
 logging synchronous
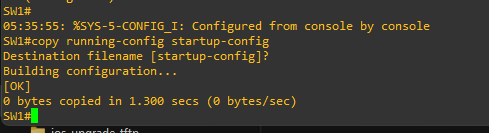
Step 7 — Save Configuration
The running configuration was saved to NVRAM to ensure all security settings persist after a reload.
copy running-config startup-config
Verification
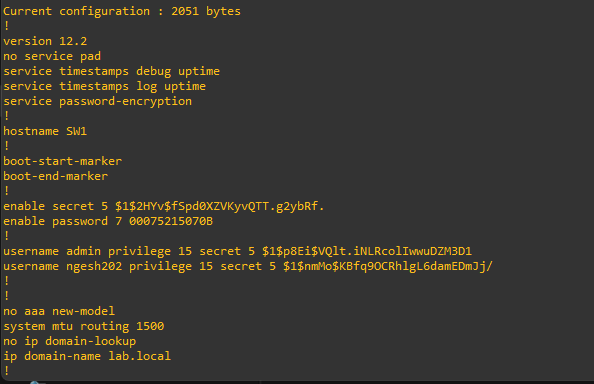
The following commands were used to verify the complete security configuration.
show ip ssh

show users

show running-config

show ssh

Testing — SSH from Windows
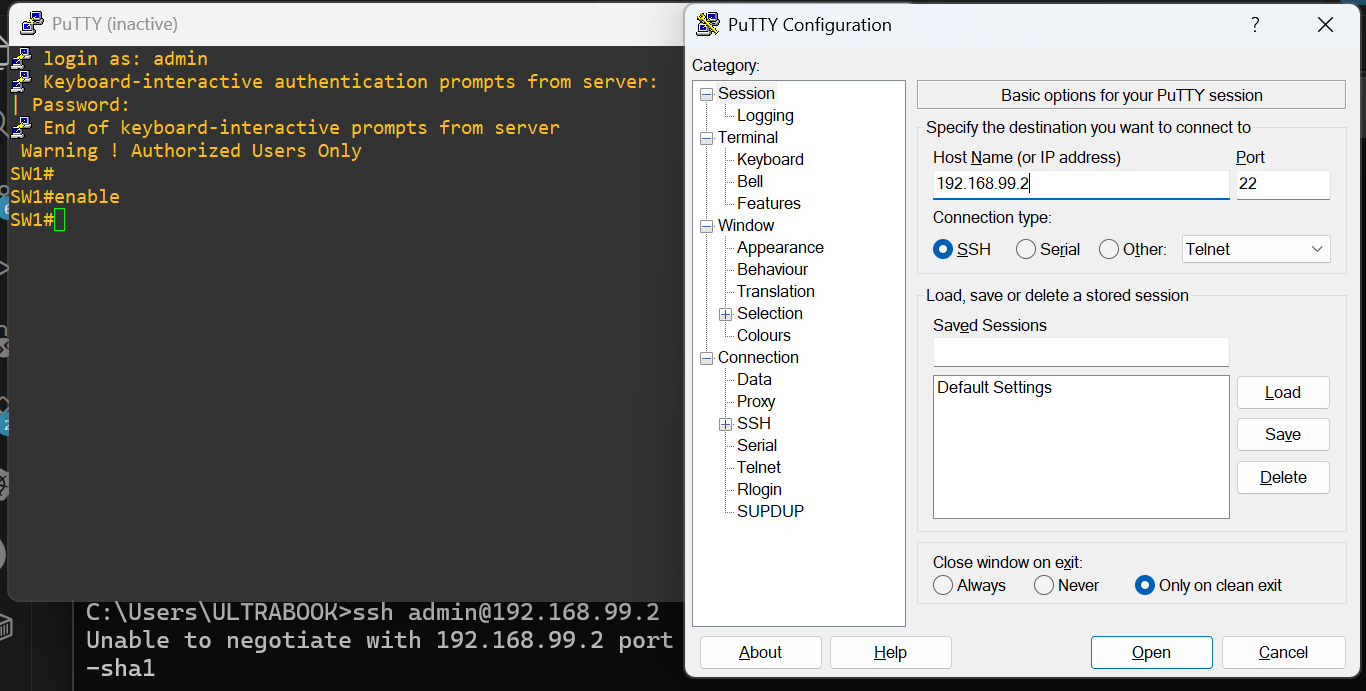
SSH access was tested from the Windows 11 laptop using the built-in Windows SSH client.
ssh admin@192.168.1.10
A successful SSH login confirmed that:
- SSH version 2 was working correctly
- Local authentication was functioning
- VTY lines were accepting SSH connections
- The MOTD banner was displayed on login
Verification Checklist
- ✅ Hostname configured
- ✅ MOTD banner configured
- ✅ DNS lookup disabled
- ✅ Enable secret configured
- ✅ Service password-encryption enabled
- ✅ Console line secured with password and timeout
- ✅ Local administrator account created
- ✅ RSA 2048-bit keys generated
- ✅ SSH version 2 enabled
- ✅ VTY lines restricted to SSH only
- ✅ Local authentication on VTY lines
- ✅ Configuration saved to NVRAM
- ✅ SSH access tested and confirmed from Windows
Key Takeaways
This lab demonstrated how to apply a complete security baseline to a Cisco Catalyst switch — a task performed by network engineers before any device is deployed into a production environment.
Key concepts demonstrated:
- Device identity — hostname and banners identify the device and warn unauthorised users
- Enable secret — MD5-hashed privileged access password, always preferred over enable password
- Service password-encryption — encrypts plaintext passwords in the running configuration
- Console hardening — physical access must be protected with passwords and timeouts
- Local accounts — named accounts provide auditable access and are required for SSH authentication
- SSH vs Telnet — SSH encrypts all traffic including credentials, Telnet does not
- RSA keys — required for SSH, 2048-bit minimum is current best practice
- VTY restriction — transport input ssh ensures Telnet is completely disabled
A hardened switch configuration is a fundamental skill expected of any junior network engineer working in an enterprise environment.
Commands Reference
hostname SW1
no ip domain-lookup
banner motd ^ message ^
enable secret <password>
service password-encryption
line console 0
 password <password>
 login
 exec-timeout 10 0
 logging synchronous
username admin privilege 15 secret <password>
ip domain-name lab.local
crypto key generate rsa modulus 2048
ip ssh version 2
ip ssh time-out 60
ip ssh authentication-retries 3
line vty 0 15
 login local
 transport input ssh
 exec-timeout 10 0
copy running-config startup-config
show ip ssh
show users
show running-config
show ssh
References
- Cisco IOS Security Configuration Guide
- Cisco CCNA 200-301 Official Cert Guide — Volume 1
- NIST Guidelines for Securing Network Infrastructure Devices